...
For our example we will just call it Apples:
Open
...
Cash Register.
Go to
...
Customers.
Select any
...
customer.
Within the
...
Customer account select the ellipsis“[…]” beside “Groups“.
In the Sub Groups section select the green plus icon.
Name The Group.
Save
...
After you have a group created under Employees or Customers, you can now create and assign a discount to the group.
Open the Products module.
Select Promos.
Select the New button.
Select Create Custom. This will open the Manage Promotion window.
...
In the Manage Promotion window name the Discount.
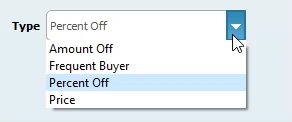
Select the Type with the drop-down menu. For our example, we will use Percent Off.
Enter the Discount amount. The wording and discount amount will vary based on the type of discount given.
Amount Off- Will have an Amount off each discount. Ex: $1 dollar off each bag of promo dog food.
Frequent Buyer- Will have a Reward Quantity based on Frequent Buyer habits. Ex: Buy 10, get 1 free. 10 on “Min Buy Qty” and 1 on “Reward Qty”.
After they buy 10 of them, the average amount that they spent can be used toward their 11th one.
-So if the price was the same the whole time, it would be free.
-If they purchased 5 at $5, and 5 at $10, they would get up to a $7.50 discount on the 11th.
Percent Off- will let you enter a percent off the item's price. Ex 50% off the price on the promo items
Price- will reduce the price per each individual promo item. Ex : normal price $3.00 - during promo $2.50
Under the “Qualifiers Per Invoice” section, Check the box for Groups and choose the group you created.
Press Save
...
Adding Qualifying products.
The Second tab is dynamic and will change depending on what is selected in the “Limit By” drop box. -An additional tab called “Excluding Products“ will appear next to the second tab, if the option for “Selected Categories Excluding Specific Products“ is selected.
If “Limit By” is not selected, all store products will be included in the promotion.
...
Use The second tab to include/exclude products and categories as shown below.
Use the “Add” button to search for products.
Be sure to press “Save” when you are finished.
This is not required to use this promo as a discount. Leave “Limit By” unchecked if you want to apply this promo to all products, for the assigned customers/employees.
...
Before you start a sale, make sure you have added this Discount (Promo) to the corresponding customer or employee, using the group drop box.
Press save after you have assigned the discount.
...
Once you have assigned the discount to the customer, a sale to this person will look something like this:
...
